Google Webmaster Tools constitute a free service provided by Google to the webmasters. It allows webmasters to add their websites and then view and analyze various Google Search Engine related statistics. Some of the functions which webmasters can perform are:
- Submit their sitemap for Google to crawl the links in it. This also discloses any broken links.
- View sites that link to their site and how they link it.
- View the Search result impressions and clicks to their site.
- View the search queries that resulted in listing of their site in the results.
- View how Google fetches / views their site.
And much more.
It is a vast topic and we will cover it in parts beginning from the very start.
It is a vast topic and we will cover it in parts beginning from the very start.
Login to Google Webmaster Tools:
To use Google Webmaster Tools, you must have a Google account. If you do
not have one, just register for Gmail at http://www.gmail.com
Login to Google Webmaster Tools at http://www.google.com/webmasters/ with your Google login information.
Add Website:
Now you will see the text box to add your website's URL. Type in the URL and hit Add Site button
Your site will be added as shown below. However, to utilize the tools, you need to confirm your ownership of the site you have added.
Verify Ownership of Site:
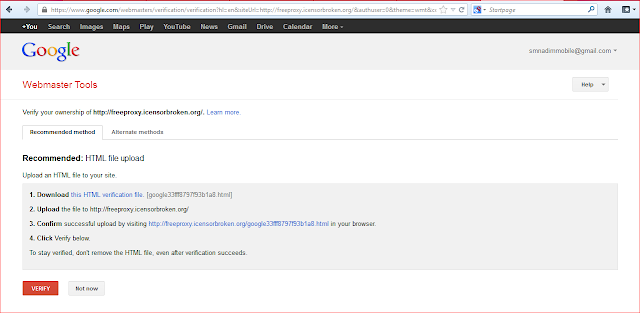
Although, Google provides several methods for verifying that you have ownership of the site, the easiest one is presented to you by Google. You have to download a small html file (3-4 kb) and upload it to your sites root directory. Then click the verify button and Google will check if the file has been uploaded to your site. If Google finds the file, it means that the site is owned by you.
Site DashBoard:
After verification, you will reach this screen showing all the tools and overview of the site.
Since the site has just been added, there is no data.
Since the site has just been added, there is no data.
Tools Home:
The next time you login to Webmaster Tools or if you click the Webmaster Tools link (when logged in), you will be presented with this screen showing the list of your websites along with their snapshot.
While at this screen, you can add more sites by clicking the red link on the right. Clicking any of the listed sites takes you to the Site DashBoard.
While at this screen, you can add more sites by clicking the red link on the right. Clicking any of the listed sites takes you to the Site DashBoard.
Submit SiteMap:
Take a look at the Site Dashboard. In the Sitemaps section, it says "No Sitemaps". You have to submit your sitemap to Google. Click on "No Sitemaps" to go to detailed view in respect of sitemaps. You can also reach here through the menu on the left by clicking on "Crawl" and then "Sitemaps".
Here click the red button / link on the right, fill in the name of your sitemap file and click the "Submit Sitemap" button. We presume, you already have Sitemap file at your site. Otherwise, go to this post about making your proxy site to know how to make sitemap of your site.
Refresh the page and Google will tell you how many pages your sitemap mentions and how many have been indexed by Google. Since, the site is new, no pages would be indexed at this time.
Come back after a few days and Google would have made progress in indexing your pages.
In a later post we will explore the various Webmaster Tools. Till then add all your sites to Google Webmaster Tools!


No comments:
Post a Comment